Touken Ranbu Wiki
Advertisement
151229 RegimentBattle

151229 eventregiment banner
In Regiment Battle (連隊戦), enemy waves will come one after another! Defeat them by using the ability to switch teams mid-battle! To enter the event, select the banner from the sortie page.

Event Period: 29 December 2015 (Tues) 17:00 until 18 January 2016 (Mon) 14:00 Japan Standard Time.

January 18 2016 14:00 +0900 until event's over!

How to Play[]

General[]

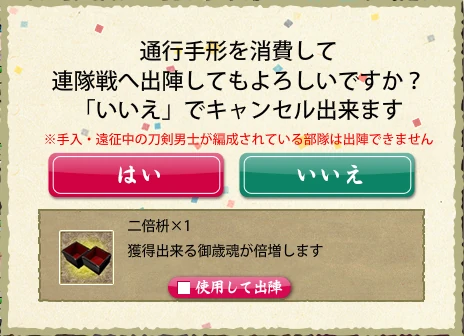
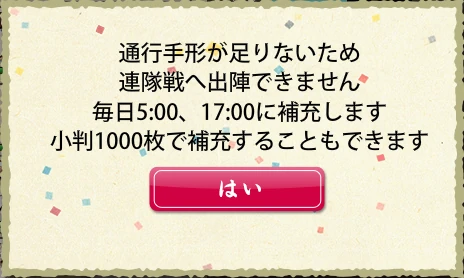
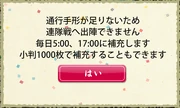
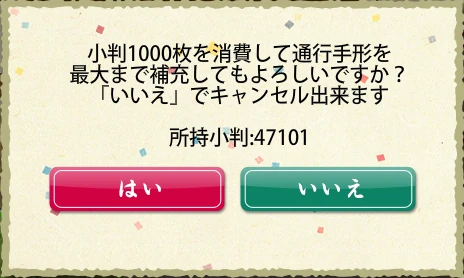
Event passes are required to participate in the 'Regiment Battle' event. Each sortie uses up 1 pass. The maximum number of passes that can be stored is 3, and can be replenished with 1000 koban. Passes are automatically replenished for free every day at 5:00 and 17:00 JST.

Warning1

1 pass consume warning

Warning2

Not enough passes left warning

Warning3

Purchasing passes warning

There are 4 maps in this event: Easy, NormalDifficult and Expert. The new sword Higekiri has a chance of dropping from the final wave of the Expert map.

As usual, clearing a map will open up the next one.

Event Sortie Rules[]

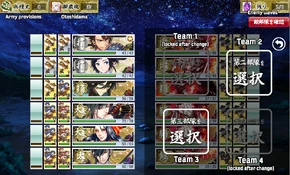
When going on sortie, the chosen team will be the first to fight. Once on sortie, all 4 teams can be used freely to fight consecutive enemy teams, with the aim to defeat all of them. Every map has fixed day or night battle conditions.

Battle options1

If your team is at full health, there is no "Restore" option.

Battle options2

If you change your team, you can't choose it again in the same sortie.

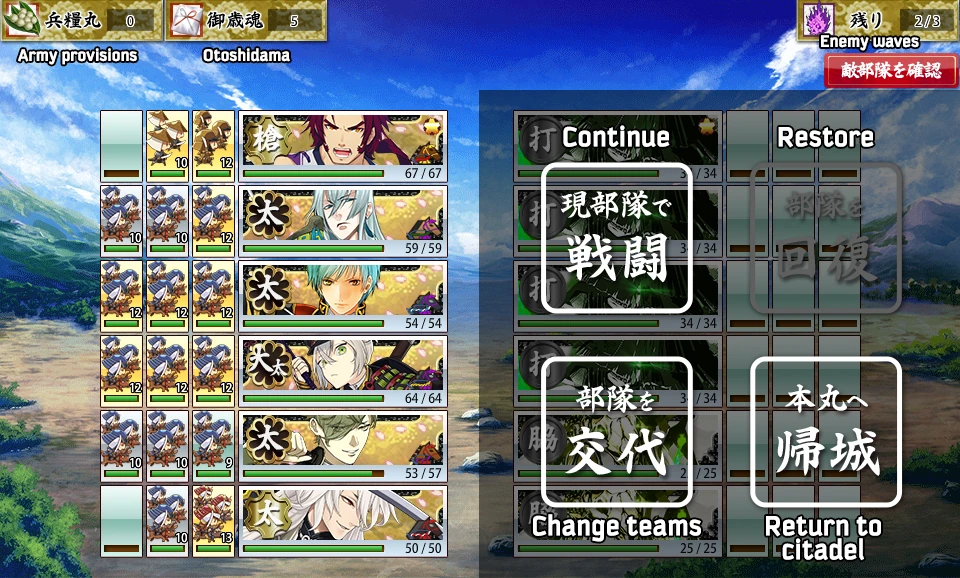
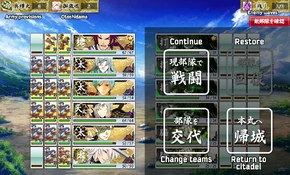
After winning a battle, the following options will be available, from top to bottom, left to right:

  • Continue: Proceed to the next wave with the currently selected team
  • Restore: Use 'Army Provisions' item to fully heal the currently selected team
    • Not available if the whole team is at full health
    • Does not replenish sword morale or troop health
    • Warning: the game will not ask to confirm your choice, so click carefully!
  • Change teams: Swap your current team out for another team.
  • Return to the citadel: End the battle and return to the citadel, taking all earned Otoshidama with you.

Additionally, pressing the large red button under the wave counter will hide these options, allowing the player to assess the enemy's formation and scenario to pick out the most appropriate team to use. Pressing it again restores the panel.

Note:

  • Once a team has been changed out, that team cannot be used again for the remainder of the sortie, so make sure to time your team swaps carefully to avoid being disadvantaged by the changed match conditions. Do take the time to find a team formation that will be advantageous in battle.
  • Teams participated in the sortie will receive their share of XP upon the completion of the final wave, or upon returning to the citadel. All swords in a team will receive the same amount of XP irrespective of their performance and participation in fights.
  • If your team captain is heavily injured, the 'Continue fighting with the current team' option will be disabled. You can either use the 'Army provisions' item under the 'Restore team' option to continue fighting, or choose the 'Change teams' and 'Return to citadel' options.

Otoshidama[]

Defeating enemies during the event will yield Otoshidama, which can be collected at the end of the sortie or cashed in earlier than usual by returning to the citadel between matches. Completing the entire sortie will also apply a small multiplier to the amount of Otoshidama collected that scales with the chosen map's difficulty, though being forced back to the citadel due to losing will only yield 50% of the total count.

Rewards will be received after winning certain numbers of Otoshidama. Please refer to the Rewards section for details. The current number of Otoshidama collected is displayed next to the event banner.

Note: The 'Winter Garden: Night, Snow-viewing Shoji' background debuts in this event and can be earned as a reward. If missed, it may be purchased later with koban.

Special Items[]

The following items may be used during the event sorties. These items may be claimed as rewards for collecting Otoshidama at certain numbers, or may be purchased at the Shop.

  • Army Provisions: While on a Regiment Battle sortie, this restores the health of all members of the currently selected team, including swords that are no longer able to battle. Note: it does not restore troops.
  • Double Boxes: Using this before going on a sortie will double the Otoshidama earned.

Note: These items are for the Regiment Battle event only. Once the event ends, any unused items will vanish.

Rewards[]

Rewards Otoshidama Needed   Rewards Otoshidama Needed   Rewards Otoshidama Needed
Army Provisions x1 30 Elites x1 6000 Archers x1 22500
Double Boxes x1 100 Army Provisions x1 7000 Kousetsu Samonji 25000
Light Infantry x1 300 Double Boxes x1 8000 Musketeers x1 27500
Light Cavalry x1 500 Shieldmen x1 9000 Aoge (Horse) x1 30000
Akita Toushirou 750 Mutsunokami Yoshiyuki 10000 Catapults x1 32500
Army Provisions x1 1000 Army Provisions x1 12000 Winter Night Background 1 and 2 35000
Double Boxes x1 2000 Double Boxes x1 14000 Shieldmen x1 37500
Spearmen x1 3000 Heavy Infantry x1 16000 Help Token x1 40000
Expedition Recall Pigeon x1 4000 Army Provisions x1 18000 Heavy Infantry x1 45000
Honebami Toushirou 5000 Souza Samonji 20000 Hizamaru 50000

In the Event of Internet Disconnections[]

Interrupted connection warning

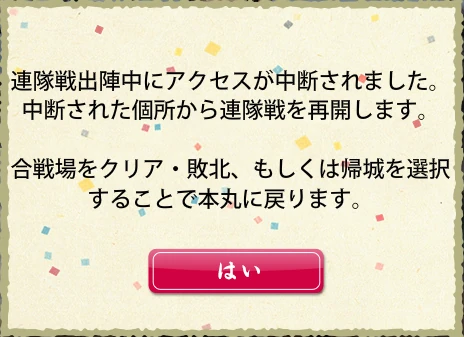
During the event, if the game is interrupted due to connection issues, it may be possible to continue playing from where the interruption occurred after logging in again and data recovery.

Furthermore, if the interruption occurred after a battle has begun, the battle will be considered completed with the outcome decided. If the outcome was a defeat, the player will be returned to the citadel with the Otoshidama number reflecting this outcome.

Notes[]

  • Teams under the following conditions may not participate in this event:
    • The team slot has yet to be unlocked
    • The team is on an expedition
    • The team has members in the Repair room
    • The team captain is heavily injured
  • Injuries and lost troops will be healed upon returning to the citadel.
  • Fatigue will accumulate during sorties.
  • A sword will not break even when continuing while heavily injured; instead, he will not participate in the next battle.
    • As swords do not break in event maps, any equipped Omamori will not be consumed.
  • There are no sword drops outside of the boss fights.
  • Battles fought during this event will count towards completing Missions.
  • There is no level cap for earning experience points.
  • Battle formations are not chosen in this event.
  • Victories and defeats during this event will not be reflected in your Battle Records.
  • The Kebiishi will not appear.
  • Whether a drop appears at the end of the map or not depends only on the battle results of the last wave. (ex. a C Rank on the final wave will have no drop).

Maps[]

Each wave's battle conditions are fixed; however, enemy patterns may vary slightly.

Battlefield Conditions Description and details
Daytime Battles (by default)
  • All swords will function normally in the battle.
Night Battles (夜戦)
  • Tachis, Ootachis, Yaris, and Naginatas will suffer from significant stats disadvantage.
  • Tantous and Wakizashis will receive significant stats advantage.
  • All player and enemy swords will have the chance to evade in the long-range attack phrase.
Urban Battles (市街戦)
  • Horses may be equipped, but their stat bonuses will have a reduced effect.
    • Light Cavalry and Heavy Cavalry will function normally.
Indoor Battles (屋内戦)
  • Ootachis and Naginatas will only attack one enemy at a time.
  • Horses may be equipped, but their stat bonuses will not take effect.
    • Light Cavalry and Heavy Cavalry will function normally.
  • Catapults and Archers may be equipped, but will not function in the long-range attack phrase.
    • Musketeers will function normally in the long-range attack phase.
Castle Battles (城内戦)
  • Ootachis and Naginatas will only attack one enemy at a time.
  • Horses may be equipped, but their stat bonuses will not take effect.
    • Light Cavalry and Heavy Cavalry will function normally.
  • Musketeers, Catapults and Archers may be equipped, but will not function in the long-range attack phrase.
Rain Battles (雨戦)
  • Musketeers may be equipped, but will not function in the long-range attack phrase.
    • Catapults and Archers will function normally in the long-range attack phase.
Morning Battles (朝戦)
  • Tantous, Wakizashis and Uchigatana will receive a slight stat advantage.
Drizzle Battles (霧雨)
  • Musketeers may be equipped, but will have reduced damage.
    • Catapults and Archers will function normally in the long-range attack phase.

Easy[]

  • Difficulty level:
  • Number of waves: 3
  • Otoshidama per wave: 5
  • Base experience per wave: 100
  • Otoshidama multiplier for clearing the map: 1.2x
Enemy List
Node
Enemies / Notes
1
Daytime Battles
Uchi a-gr Uchi a-gr Waki a-gr Waki a-gr Tan a-gr Tan a-gr
Tachi a-gr Waki a-gr Waki a-gr Waki a-gr Waki a-gr Waki a-gr
Uchi a-gr Tachi a-gr Uchi a-gr Waki a-gr Waki a-gr Waki a-gr
2
Daytime Battles
Tachi a-gr Uchi a-gr Uchi a-gr Uchi a-gr Uchi a-gr Waki a-gr
3
Daytime Battles
Uchi a-gr Tachi a-gr Uchi a-gr Uchi a-gr Tan a-gr Tan a-gr
Tachi a-gr Tachi a-gr Uchi a-gr Waki a-gr Waki a-gr Waki a-gr


Normal[]

  • Difficulty level: ★★
  • Number of waves: 5
  • Otoshidama per wave: 10
  • Base experience per wave: 300
  • Otoshidama multiplier for clearing the map: 1.5x
Enemy List
Node
Enemies / Notes
1
Daytime Battles
Tachi b-pr Tachi b-pr Tachi b-pr Uchi b-pr Waki b-pr Waki b-pr
Ooda b-pr Yari b-pr Yari b-pr Yari b-pr Tachi b-pr Tan b-pr
Ooda b-pr Yari b-pr Tachi b-pr Waki b-pr Waki b-pr Tan b-pr
2
Daytime Battles
Nagi b-pr Nagi b-pr Tachi b-pr Waki b-pr Waki b-pr Waki b-pr
Ooda b-pr Uchi b-pr Uchi b-pr Uchi b-pr Uchi b-pr Waki b-pr
3
Outdoor Night Battles
Ooda b-pr Yari b-pr Yari b-pr Yari b-pr Tachi b-pr Tan b-pr
Ooda b-pr Yari b-pr Tachi b-pr Waki b-pr Waki b-pr Yari b-pr
4
Daytime Battles
Nagi b-pr Nagi b-pr Tachi b-pr Waki b-pr Waki b-pr Waki b-pr
Tachi b-pr Tachi b-pr Tachi b-pr Uchi b-pr Waki b-pr Waki b-pr
5
Daytime Battles
Ooda b-pr Uchi b-pr Uchi b-pr Uchi b-pr Uchi b-pr Waki b-pr
Ooda b-pr Yari b-pr Yari b-pr Yari b-pr Tachi b-pr Tan b-pr
Ooda b-pr Yari b-pr Tachi b-pr Waki b-pr Waki b-pr Tan b-pr


Difficult[]

  • Difficulty level: ★★★★
  • Number of waves: 8
  • Otoshidama per wave: 15
  • Base experience per wave: 460
  • Otoshidama multiplier for clearing the map: 1.8x
Enemy List
Node
Enemies / Notes
1
Daytime Battles
Tachi c-rd Uchi c-rd Uchi c-rd Tan c-rd Tan c-rd Yari c-rd
2
Daytime Battles
Waki c-rd Waki c-rd Waki c-rd Tan c-rd Tan c-rd Tan c-rd
Waki c-rd Waki c-rd Waki c-rd Tan c-rd Yari c-rd Yari c-rd
Tachi c-rd Tachi c-rd Waki c-rd Waki c-rd Waki c-rd Yari c-rd
Ooda c-rd Uchi c-rd Uchi c-rd Waki c-rd Yari c-rd Tan c-rd
3
Outdoor Night Battles
Uchi c-rd Uchi c-rd Tachi c-rd Tachi c-rd Tachi c-rd Tachi c-rd
Yari c-rd Uchi c-rd Uchi c-rd Tachi c-rd Tachi c-rd Tachi c-rd
Uchi c-rd Uchi c-rd Uchi c-rd Tachi c-rd Tachi c-rd Tachi c-rd
Tachi c-rd Uchi c-rd Yari c-rd Yari c-rd Tachi c-rd Tachi c-rd
4
Outdoor Night Battles
Yari c-rd Yari c-rd Uchi c-rd Uchi c-rd Uchi c-rd Tachi c-rd
Uchi c-rd Uchi c-rd Uchi c-rd Tachi c-rd Tachi c-rd Tachi c-rd
Yari c-rd Yari c-rd Uchi c-rd Tachi c-rd Tachi c-rd Tachi c-rd
Tachi c-rd Tachi c-rd Uchi c-rd Yari c-rd Uchi c-rd Tachi c-rd
Yari c-rd Uchi c-rd Tachi c-rd Tachi c-rd Tachi c-rd Yari c-rd
5
Daytime Battles
Yari c-rd Yari c-rd Waki c-rd Tan c-rd Tan c-rd Tan c-rd
Uchi c-rd Yari c-rd Yari c-rd Yari c-rd Tan c-rd Tan c-rd
Tachi c-rd Uchi c-rd Uchi c-rd Yari c-rd Yari c-rd Yari c-rd
Tachi c-rd Uchi c-rd Waki c-rd Waki c-rd Waki c-rd Yari c-rd
6
Daytime Battles
Yari c-rd Yari c-rd Tan c-rd Tan c-rd Tan c-rd Tan c-rd
Waki c-rd Yari c-rd Yari c-rd Yari c-rd Tan c-rd Tan c-rd
Waki c-rd Waki c-rd Waki c-rd Tan c-rd Yari c-rd Yari c-rd
Tachi c-rd Tachi c-rd Yari c-rd Yari c-rd Yari c-rd Tan c-rd
7
Outdoor Night Battles
Tachi c-rd Tachi c-rd Uchi c-rd Waki c-rd Waki c-rd Tan c-rd
Tachi c-rd Uchi c-rd Uchi c-rd Waki c-rd Waki c-rd Tan c-rd
Uchi c-rd Uchi c-rd Uchi c-rd Waki c-rd Waki c-rd Tan c-rd
8
Indoor Night Battles
Ooda c-rd Uchi c-rd Uchi c-rd Waki c-rd Waki c-rd Tan c-rd
Tachi c-rd Tachi c-rd Waki c-rd Waki c-rd Waki c-rd Tan c-rd


Expert[]

  • Difficulty level: ★★★★★★
  • Number of waves: 10
  • Otoshidama per wave: 15
  • Base experience per wave: 460
  • Otoshidama multiplier for clearing the map: 2.0x
Enemy List
Node
Enemies / Notes
1
Daytime Battles
Uchi e-rd Uchi e-rd Waki e-rd Ooda e-rd Yari c-rd Nagi e-rd
Uchi e-rd Uchi e-rd Ooda e-rd Ooda e-rd Ooda e-rd Nagi e-rd
2
Outdoor Night Battles
Uchi e-rd Uchi e-rd Waki e-rd Ooda e-rd Yari c-rd Nagi e-rd
Uchi e-rd Uchi e-rd Waki e-rd Waki e-rd Yari c-rd Nagi e-rd
3
Daytime Battles
Uchi e-rd Yari e-rd Ooda e-rd Ooda e-rd Yari e-rd Nagi e-rd
Yari e-rd Uchi e-rd Yari e-rd Ooda e-rd Ooda e-rd Nagi e-rd
Yari e-rd Uchi e-rd Ooda e-rd Ooda e-rd Ooda e-rd Yari e-rd
Uchi e-rd Yari e-rd Waki e-rd Ooda e-rd Yari e-rd Nagi e-rd
4
Daytime Battles
Yari e-rd Uchi e-rd Waki e-rd Waki e-rd Yari c-rd Nagi e-rd
Uchi e-rd Yari e-rd Waki e-rd Ooda e-rd Yari e-rd Nagi e-rd
Uchi e-rd Uchi e-rd Waki e-rd Ooda e-rd Yari c-rd Nagi e-rd
5
Indoor Night Battles
Waki e-rd Waki e-rd Uchi e-rd Uchi e-rd Uchi e-rd Uchi e-rd
Waki e-rd Waki e-rd Waki e-rd Uchi e-rd Uchi e-rd Uchi e-rd
Waki e-rd Yari e-rd Yari e-rd Uchi e-rd Uchi e-rd Uchi e-rd
6
Outdoor Night Battles
Waki e-rd Waki e-rd Waki e-rd Uchi e-rd Uchi e-rd Uchi e-rd
Waki e-rd Waki e-rd Waki e-rd Waki e-rd Uchi e-rd Uchi e-rd
7
Outdoor Night Battles
Tan c-rd Waki e-rd Waki e-rd Waki e-rd Uchi e-rd Uchi e-rd
Tan c-rd Tan c-rd Tan c-rd Waki e-rd Uchi e-rd Uchi e-rd
8
Daytime Battles
Uchi e-rd Yari e-rd Waki e-rd Waki e-rd Ooda e-rd Yari e-rd
Yari e-rd Uchi e-rd Waki e-rd Waki e-rd Ooda e-rd Yari c-rd
Uchi e-rd Uchi e-rd Waki e-rd Waki e-rd Ooda e-rd Yari e-rd
9
Daytime Battles
Uchi e-rd Yari e-rd Waki e-rd Waki e-rd Ooda e-rd Yari e-rd
Uchi e-rd Uchi e-rd Waki e-rd Waki e-rd Ooda e-rd Yari e-rd
10
Uchi e-rd Yari e-rd Waki c-rd Waki e-rd Ooda e-rd Yari c-rd
Uchi e-rd Uchi e-rd Waki e-rd Waki e-rd Ooda e-rd Yari c-rd
Uchi e-rd Uchi e-rd Yari c-rd Waki e-rd Ooda e-rd Yari c-rd
Uchi e-rd Yari c-rd Waki e-rd Waki e-rd Ooda e-rd Yari c-rd


Game News Recent UpdatesCampaignsEventsServer Status
Character List CharactersList by TypesList by Stats || Sword CrestsDrop List || Official ArtistsOfficial Voice Actors || KonnosukeKuronosuke
Citadel Front LinesExpeditionsPvP || EquipmentHorsesOmamoriTreasures || SmithingArmoryRepairsRefineryRanbu LevelInternal Affairs || Missions || Battle RecordsSword LibraryRecollectionsRecordings || ShopBackgroundsAttendant BGMGame MusicKoban || Walk Feature
Front Lines Era 1 Memory of the Meiji RestorationEra 2 Memory of EdoEra 3 Memory of ShokuhoEra 4 Memory of SengokuEra 5 Memory of SamuraiEra 6 Memory of IkedayaEra 7 Memory of EnkyouEra 8 Memory of Aonohara
Tutorials How to RegisterProxy Connection & TroubleshootingFAQHow to PlayGlossaryItems
Game Mechanism Combat MechanismExperienceUpgradesFatigue || EnemiesKebiishi
Media Touken Ranbu ONLINE (Smartphone App) || MusicalStage PlayMovieAnime SeriesTouken Ranbu MusouOkkii Konnosuke no Touken Sanpo || Merchandise
Community Rules and PoliciesContributingSuggestionWiki Poll Results || Wiki StaffWiki DiscussionsDiscord Server
Advertisement